FriendlyElec NanoPi R6S · Gentoo Linux

A router image that starts safe.

A hardware-tested Gentoo system for the NanoPi R6S, delivered as one self-contained SD installer with routing and WAN disabled by default.

The SD image contains both the bootable installer environment and the verified eMMC payload. No separate eMMC download is required. 16GB or larger SD Card required

Hardware testedSD → eMMC → first boot
8 GiB readbackVerified after every write
Safe by defaultNo WAN, NAT or forwarding
Kernel 6.18.48gentoo-r6s-router1

Public downloads

Only the files needed for this pathway.

The bootable SD installer already contains the verified eMMC payload. Download the convenience bundle once, or inspect and download its four files individually.

One download

Complete SD installer bundle

Contains the compressed installer image, its checksum file, the guarded Linux writer, and the router-tools license. Because the image is already compressed, the bundle is mainly for convenience rather than additional size reduction.

Download complete bundle

Extract, enter the directory, and verify the image:

tar --zstd -xf nanopi-r6s-gentoo-router-v0.2.0-r3-sd-installer-bundle.tar.zst
cd nanopi-r6s-gentoo-router-v0.2.0-r3-sd-installer
sha256sum -c nanopi-r6s-gentoo-router-v0.2.0-sd-installer-8GiB.img.zst.sha256
Individual files

These are the same four files contained in the bundle.

IMG.ZST · 5,018,771,149 bytes

Bootable SD installer

Contains the installer system and embedded eMMC payload.

Download image
Compressed-image SHA-256 50e0f51e5a4298a1e0368ed91f59e60b50352fadc2f7bc920760afd2ed1b1531
Decoded 8 GiB SD-image SHA-256 3ede8793539767b256edc59f0a2e855c2d18de133624faf08444f64831b935b8
SHA256

Image checksum

Verifies the compressed image before it is written.

Download checksum
BASH

Guarded Linux writer

Checks the image and target, confirms the device, writes, and reads back all 8 GiB.

Download writer
LICENSE

Router-tools license

License terms for the router management tooling included in the image.

Read license

Power-on posture

Nothing routes until you say so.

The public image is intentionally a management system first. It gives you a recovery address and trusted-LAN access while keeping packet forwarding and server functions off.

01

WAN stays dark

wan_fiber starts disabled. The firewall never opens WAN management access during setup.

02

Routing stays off

IPv4 and IPv6 forwarding, NAT, DHCP server, and DNS server remain disabled until explicitly configured and enabled.

03

Recovery stays reachable

lan_main uses 169.254.100.1/16; lan_wifi can obtain an address from a trusted local network.

R6S network ports

Connect to the intended interface.

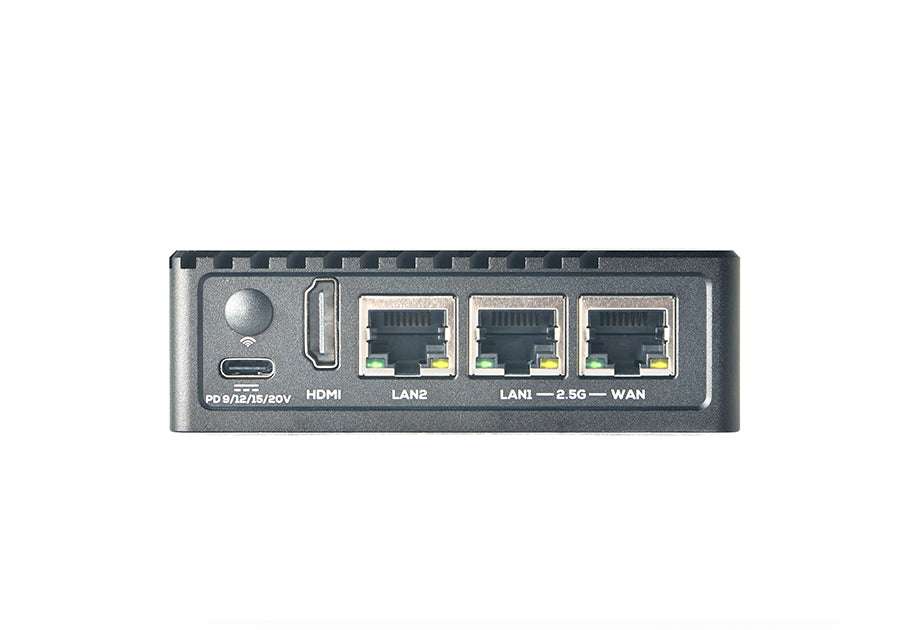
Viewed from the Ethernet side of the metal case, the three wired ports map to the image’s interface names as shown below.

Rear panel of a NanoPi R6S showing its three Ethernet ports
Rear-panel image source: ameriDroid NanoPi R6S product listing.
1

lan_wifi

Outside 1 GbE port, marked LAN2 on the case. Despite the interface name, this is a wired Ethernet port.

2

lan_main

Middle 2.5 GbE port, marked LAN1 on the case. Direct recovery management uses 169.254.100.1/16.

3

wan_fiber

Outside 2.5 GbE port, marked WAN on the case. Leave it disconnected during installation and first-login setup.

Recommended installation

Two guarded writes. Two full readbacks.

The public workflow verifies the download before touching an SD card, then verifies the SD before you use it to write eMMC.

  1. 1

    On your Linux computer

    Inspect the SD target

    Use a 16 GB or larger card. Identify its whole-disk path by capacity, model, transport, and removable status.

    lsblk -e 7 -o NAME,PATH,TYPE,SIZE,MODEL,SERIAL,TRAN,RM,RO,FSTYPE,LABEL,MOUNTPOINTS
  2. 2

    Still on Linux

    Preflight, write, and read back

    The supplied script pins the exact r3 image, rejects unsafe targets, displays the device identity, and requires WRITE /dev/sdX before erasing.

    chmod 0755 write-r6s-installer-sd.sh
    sudo ./write-r6s-installer-sd.sh --check /dev/sdX
    sudo ./write-r6s-installer-sd.sh /dev/sdX

    Replace /dev/sdX with the whole SD-card device. Choosing the wrong disk destroys its data.

  3. 3

    Boot the R6S from SD

    Run the non-destructive check

    Leave WAN disconnected. Log in as root with the initial password password, then confirm the installer booted from SD and correctly identified eMMC.

    hostname
    uname -r
    findmnt -no SOURCE,FSTYPE /
    r6s-install-emmc --check

    Expect r6s-installer, kernel 6.18.48-gentoo-r6s-router1, and root normally on /dev/mmcblk0p9.

  4. 4

    Authorize eMMC installation

    Write, verify, remove SD

    Run the installer, review its source and target, and type its exact ERASE /dev/mmcblk1 confirmation. Wait for the full 8 GiB readback.

    r6s-install-emmc
    poweroff

    After shutdown, remove the SD card and boot eMMC. The first-login assistant changes the root password and lets you choose separate or bridged safe management.

Optional post-install hardening

Regenerate the SSH host keys.

Host-key uniqueness was not independently tested across multiple devices. After the first eMMC boot and password setup, you can generate a fresh local set before relying on SSH fingerprints.

This changes the router’s SSH identity. Existing clients will warn that the host key changed and must remove the old saved fingerprint.

rm -f /etc/ssh/ssh_host_*_key /etc/ssh/ssh_host_*_key.pub &&
ssh-keygen -A &&
rc-service sshd restart &&
ssh-keygen -lf /etc/ssh/ssh_host_ed25519_key.pub

Then, on each client: ssh-keygen -R <router-address> and verify the newly displayed fingerprint before reconnecting.

Published file

write-r6s-installer-sd.sh

This view loads the exact script from the public download directory.

Loading…